How to connect an external speaker to a Samsung TV
इस लेख को हिंदी में देखने के लिए कृपया यहाँ क्लिक करें
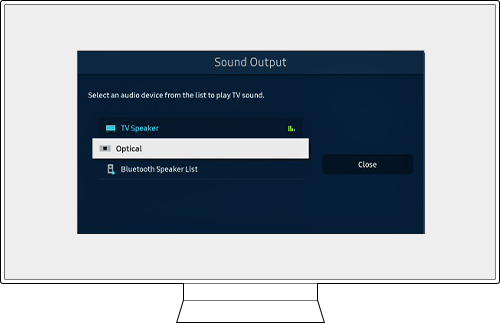
Check the Sound Output
By default, the Sound Output is set to the TV Speakers.
Before changing the settings, check the connection method between the TV and external audio device.
- On the remote control, press the Home button and navigate to Source > Connection Guide > Audio Device.

Note:
- External speakers may not be controlled with the Samsung Smart Remote, and some sound menus are not supported.
- If the TV is set to use external speakers, many of the settings under Expert Settings will be greyed out.
When the TV is connected to an external device, such as a DVD/BD player or a set-top box via HDMI, power sync mode will be activated automatically. In the power sync mode, the TV continues to detect and connect external devices via HDMI cable. This function can be deactivated by removing the HDMI cable of the connected device.
Step 1. Connect the cable to the TV's HDMI IN (eARC).
Step 2. Connect to the HDMI OUT (TV-ARC/eARC) port of the external speaker.

Step 3. Press the Home button and select Settings.
Step 4. Select Sound > Expert Settings.
Step 5. Change HDMI eARC Mode to Auto.

Note:
- You can connect an audio device that supports eARC via HDMI-eARC. Muting occurs temporarily during device connection.
- Select the Digital Output Audio Format. If you select the Auto option, the audio device automatically outputs in a supported format. If you select the Pass-through option, audio data is output with no processing.
If an external audio device is connected using an optical cable, the Sound Output setting automatically changes to the connected device. However, you must turn on the external audio device before connecting the optical cable.
Step 1. Connect the cable to the TV's Optical In.
Step 2. Connect to the Digital Audio Out (Optical) port of the external speaker.

To manually change the Sound Output setting, do one of the following:
Option 1. When using the Easy Setup screen
Step 1. Press the Home button on the remote control and select Settings.
Step 2. Using the directional pad, select Optical in Sound Output.

Option 2. When using the Full Setting screen
Step 1. Press the Home button on the remote control and select Settings.
Step 2. Press Sound > Sound Output and select Optical.

Note: Depending on the model, the optical jack may not be supported.
You can connect and use various Bluetooth devices (speakers, earphones) easily and conveniently. Follow the steps below.
Step 1. Turn on the speaker you want to connect to, then press and hold the pairing button.
Step 2. Power on the Samsung Smart TV.
Step 3. On the remote control, press the Home button, then select Settings.
Step 4. Navigate to Sound > Sound Output and select Bluetooth Speaker List.

Step 5. Select the speaker you want to connect to and complete pairing.

Using the Wi-Fi function, you can enjoy high-quality sound sources from Smart TVs without interruption or loss of sound. See below for details. This function is only available for Samsung TVs and Samsung Soundbars.
- Check the Wi-Fi connection of your Samsung Smart TV.
- Check that the speaker you want to connect to is connected to a wireless network.
- Check that the TV and speaker are connected to the same wireless network.
Step 1. Press the Home button on the remote control and select Settings.

Step 2. Navigate to Sound > Sound Output.

Step 3. When prompted with a list of speakers in the same wireless network, select the device you want to connect to.

Note: This feature is available only for models after 2013.
Note:
- If you are having trouble with your Samsung Smart TV, you should always check to see if there are any software updates available as these may contain a fix for your problem.
- Device screenshots and menus may vary depending on the device model and software version.
Thank you for your feedback!
Please answer all questions.
RC01_Static Content : This text is only displayed on the editor page


