What is Bixby and how do I use it?

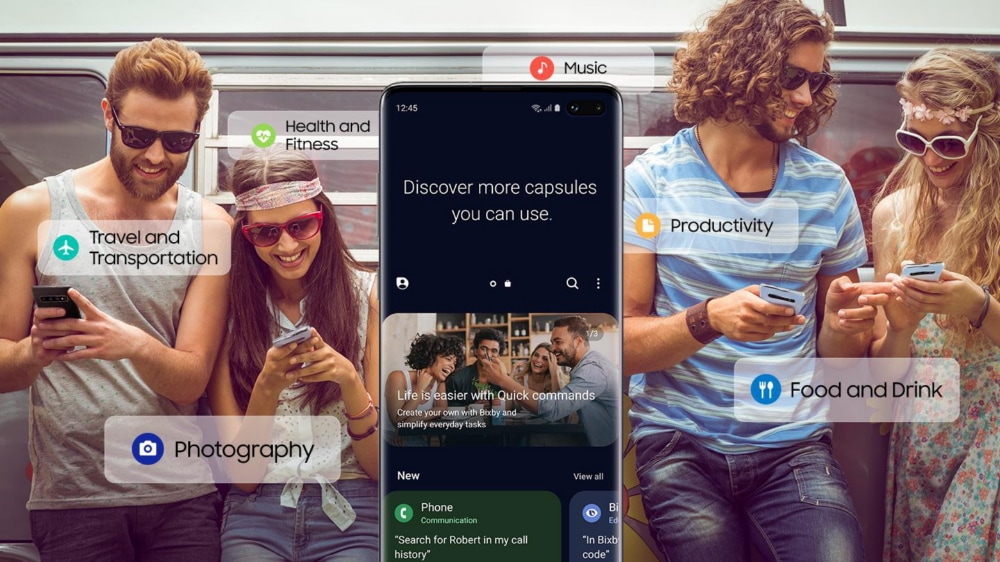
Bixby is a virtual assistant that makes it easier to use your phone, giving you more time to focus on what matters the most. Bixby learns, evolves and adapts to what you like to do, working alongside your favourite apps and services to help you get more done. Bixby will remember how you interact with it, to give you a more individualised experience. The more you use Bixby, the better it will become at adjusting to your needs.

Bixby is integrated into many of the functions in your phone and can be used in different ways, depending on what you are doing. Choose a Bixby function to learn more about:

Please note: the range of available Bixby features and functions will differ depending on your device and region

How do I activate Bixby?

Activating Bixby will differ depending on the device you are using and your preferred settings. Bixby can be activated using the side key or Bixby key, which are both located underneath the volume buttons on the left hand side of your device. 

If your device has a Bixby key, pressing it once will open Bixby home, no matter what you are doing with your device at the time. You can also activate Bixby voice by holding down the Bixby key.

If your device has a side key, you can launch Bixby Home by pressing and holding the side key.

Side button and Bixby button
1 Press the Bixby key or side key to activate Bixby
Side button and Bixby button
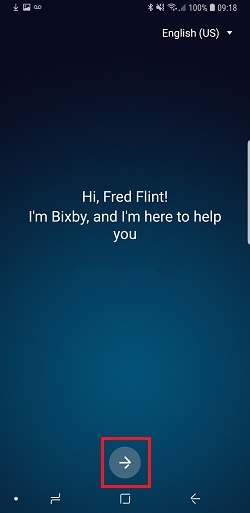
2 Tap the next icon
Tap the nex icon

If you’re not signed in to your Samsung account, you will be prompted to sign in.
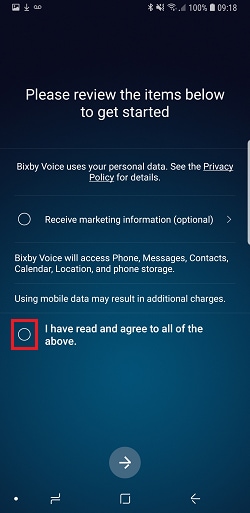
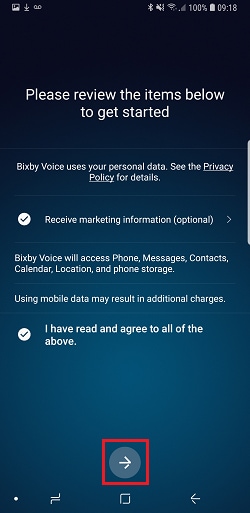
3 Read and agree to the terms and conditions, then tap the checkbox
Tap the checkbox
4 Tap the next icon
Tap the next icon

You will now be taken through a tutorial of what Bixby can do and how to use it.

Please note: it is not currently possible to disable the Bixby key. The closest possible option is to set Bixby to open with a double press of the Bixby key so you can use a single press to activate your preferred app or command
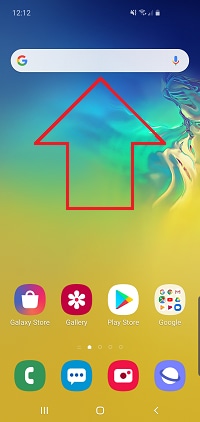
1 Swipe up from the home screen, to access your apps
Swipe up on the home screen
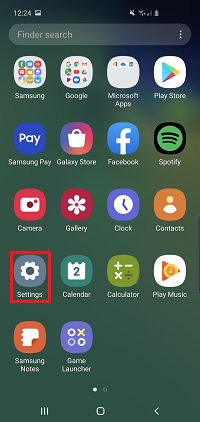
2 Open the Settings app
Open the settings app
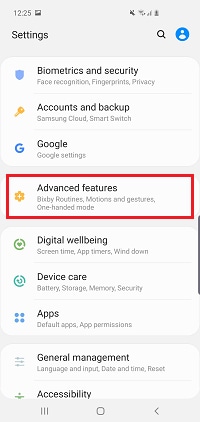
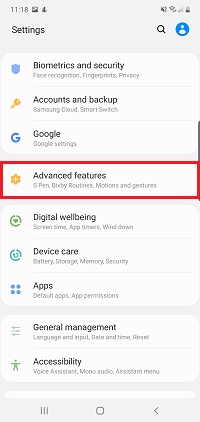
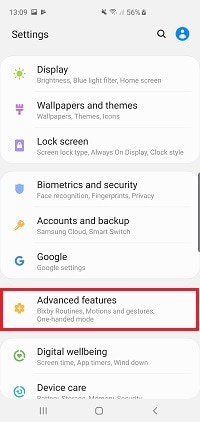
3 Tap Advanced features
Tap Advanced features
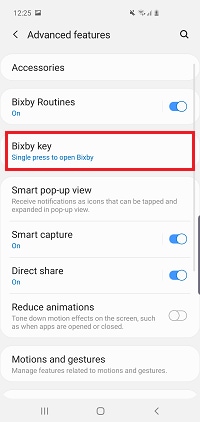
4 Tap Bixby key
Tap Bixby key
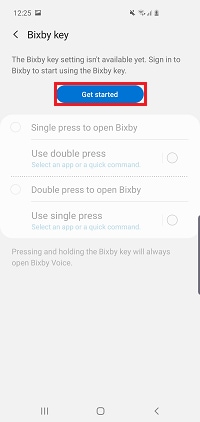
5 If you haven’t already set up Bixby, tap Get started
Tap Get started
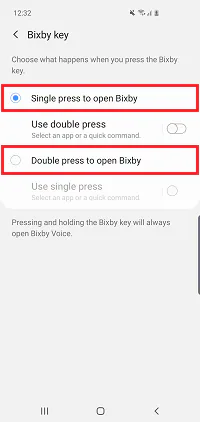
6 Choose whether you’d like to activate Bixby with a single or double press of the Bixby key
Choose whether to use a single or double press of the Bixby button

Depending on your choice, you can now set a single or double press of the Bixby key to activate an app or command.

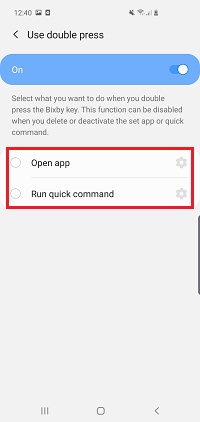
7 To use the Bixby key to activate an app or command, tap the switch
Tap the switch
8 Choose whether to open an app or run a command
choose whether to open an app or command
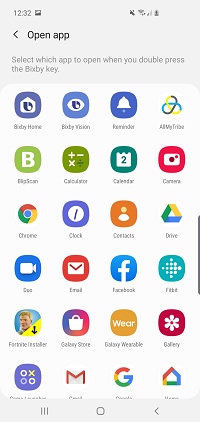
9 If you chose to open an app, tap the app you wish to open with the Bixby key
Tap the app you wish to open
10 If you chose to run a quick command, tap the command you wish to activate with the Bixby key
Tap the command you wish to use

On devices with a side key, you can set it to open apps, features or to open the power off menu. This means that you can choose whether the side key will activate Bixby.
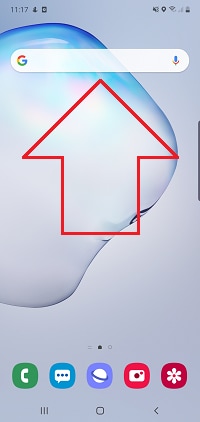
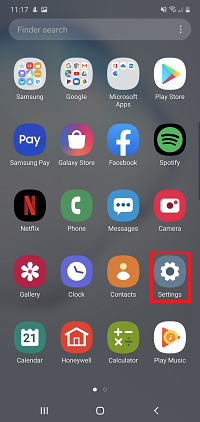
1 Swipe up on the home screen, to access your apps
Swipe up
2 Open the Settings app
Tap Settings
3 Tap Advanced features
Tap Advanced features
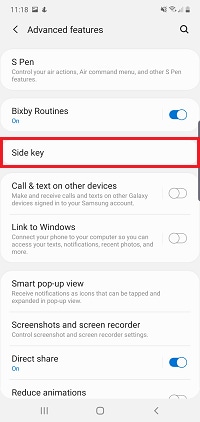
4 Tap Side key
Tap Side key
5 To use Bixby with a double press of the side button, tap Open Bixby

Please note: if this option does not appear, tap the switch next to double press
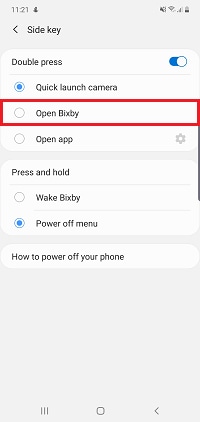
Tap Open Bixby
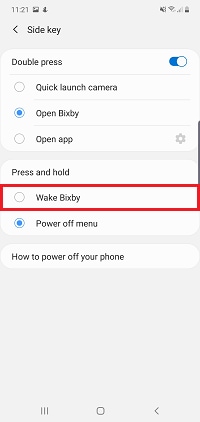
6 To use Bixby by holding the side key, tap Wake Bixby
Tap Wake Bixby

If Bixby is having trouble recognising your voice or isn't working as you would expect, it may help to reset Bixby. Bixby's features are divided into seperate apps, making it easy to reset the specific feature that you having having difficulty with.

1 Swipe up on the home screen, to access your apps
Swipe up
2 Open the Settings app
Tap settings
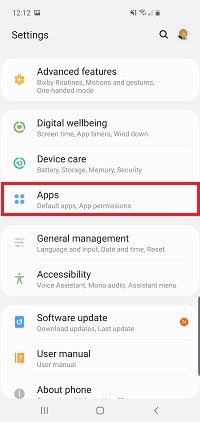
3 Tap Apps
Tap Apps
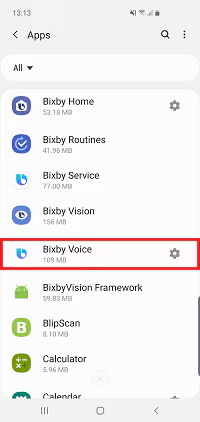
4 Tap Bixby Voice
Tap Bixby Voice
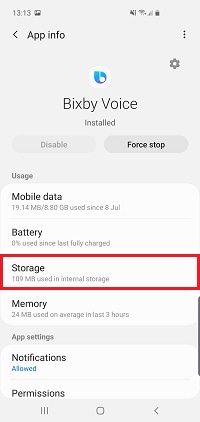
5 Tap Storage
Tap Storage
6 Tap Clear data

Please note: by clearing your data you will permanently delete your Bixby information for this Bixby feature. For example, clearing the data for Bixby Voice will mean that you have to reregister your voice to use the feature again
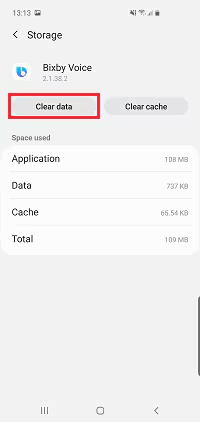
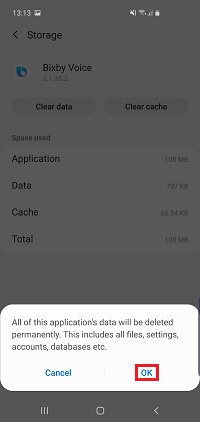
Tap Clear data
7 Tap OK
Tap OK
Bixby home header

Bixby Home

Bixby Home is a constantly updating homepage that displays content from your apps. Using Bixby Home you can quickly see information about the weather, reminders of your upcoming events, news articles and more, all displayed in easy to read cards. You can customise Bixby Home to your preference by adding and removing cards, or turn it off completely.

If you haven't set up Bixby before, make sure you are connected to the internet and have signed into your Samsung Account. Find out more about setting up or signing into a Samsung account.
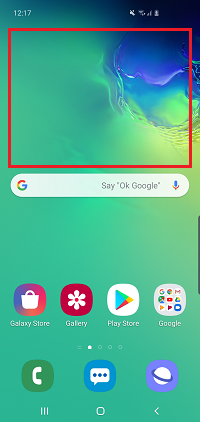
1 Touch and hold any blank area of the home screen
Touch ad hold any blank area of the home screen
2 Swipe right to view Bixby Home
Swipe right
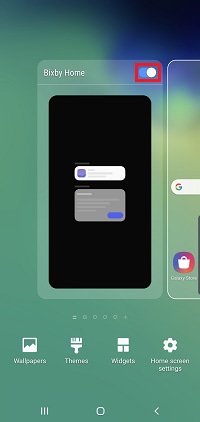
3 Tap the switch to disable Bixby Home. It will turn grey when disabled
Tap the switch

Bixby cards provide small summaries of the most recent and relevant information from your apps. For example, a weather card would show you the weather forecast for the day.
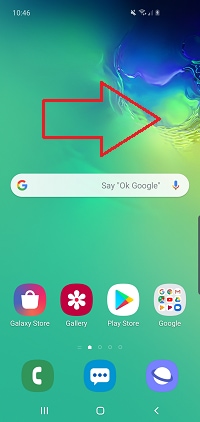
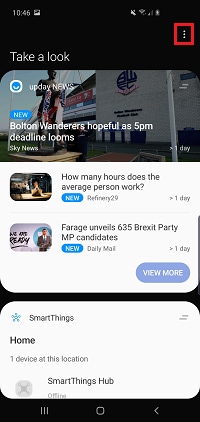
1 From the home screen, swipe right to open Bixby Home
Swipe right on the home screen
2 Tap the menu icon. It will appear as three dots in the top right corner
Tap the menu icon
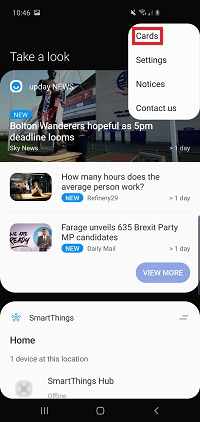
3 Tap Cards
Tap cards
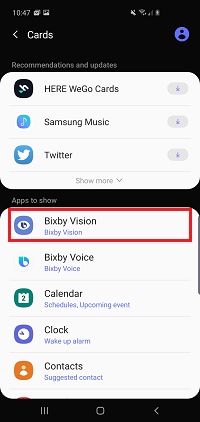
4 Tap the app whose card you want to display
Tap the app whose card you want to display
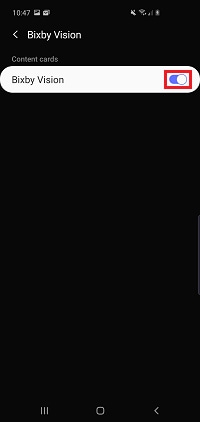
5 Tap the switch to turn that apps card on or off. The card is on when the switch moves to the right
Tap the switch to turn cards for the app on or off

You can personalise your Bixby Home to make sure that the most important cards are always at the top. You can also choose to hide cards temporarily or permanently, giving you control over the content you see.

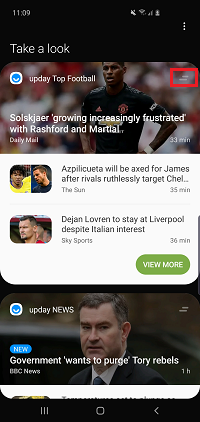
1 Swipe right from your home screen, to access Bixby Home
Swipe right on your home screen
2 Tap the menu icon on the card you want to make changes to
Tap the menu icon
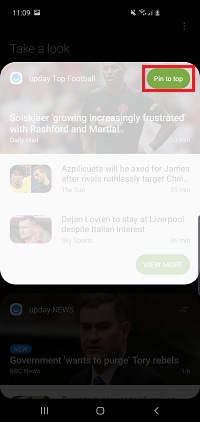
3 To pin the card to the top of your cards in Bixby Home, tap Pin to top
Tap Pin to top
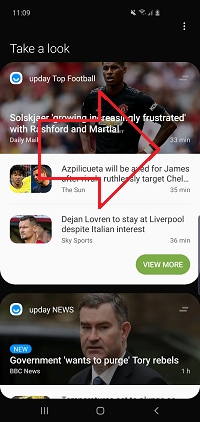
4 To hide a card, swipe right on the card you want to make changes to
Swipe right on the card you want to hide
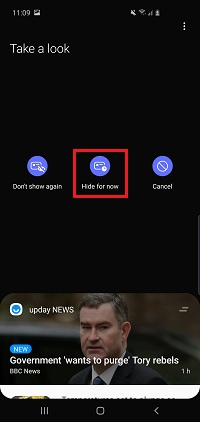
5 Tap Hide for now, to temporarily hide the card
Tap <b>Hide for now</b> to hide the card temporarily
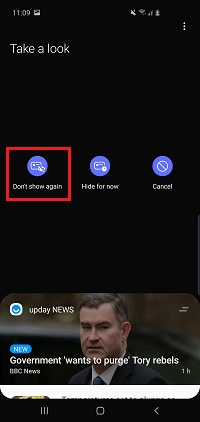
6 Tap Don’t show again to prevent the card from ever appearing in Bixby Home
Tap <b>don't show again</b> to stop the card from appearing
Bixby Vision header

Bixby Vision

Bixby Vision is an image search feature. Simply point the camera at an object, image or location and Bixby Vision will tell you more about it. You can use Bixby Vision to identify and shop for items, translate text and identify locations. Bixby Vision can be used in your Camera, Gallery and Samsung Internet apps.

The process of enabling Bixby Vision and the features available will differ depending on the app you are using it in.

Camera

Bixby suggets information based on what you are looking at.

1 Open the Camera app
Ope the camera app
2 Tap Bixby Vision
Tap bixby Vision

Gallery

Bixby can analyse what's in photos that you've taken or downloaded.

1 Open the Gallery app
Open the Gallery app
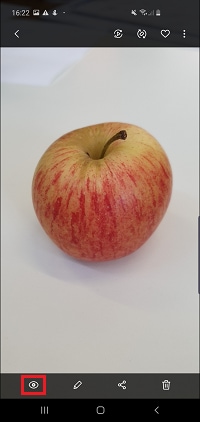
2 Tap the Bixby Vision icon. It looks like an eye
Tap the bixby Vision icon

Samsung Internet

Learn more about what you are browsing by analysing the images.
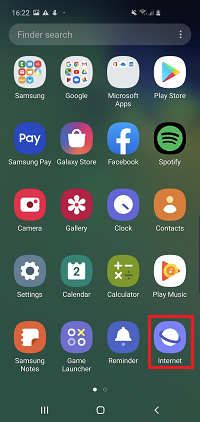
1 Open the Internet app
Open the Internet app
2 Touch and hold the image you want to learn more about
Touch and hold the image you want to know more about
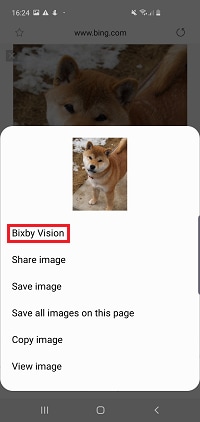
3 Tap Bixby Vision
Tap Bixby Vision

Turn on Bixby Vision in the Camera app.
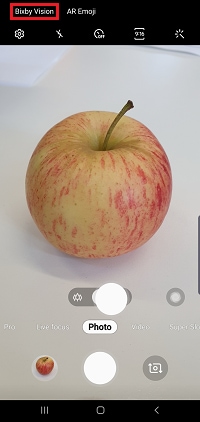
Tap Bixby Vision

Bixby Vision is now active. Move your camera around and focus on different objects to interact with them. Depending on what you are looking at, Bixby Vision can suggest different options:

Image: this will provide you with similar images to what Bixby has identified
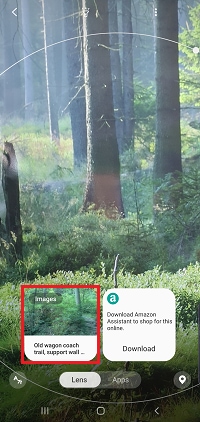
Bixby Vision images

Shopping: this will search online shopping sites to find product information
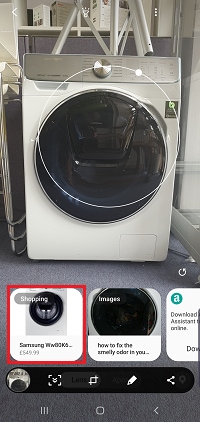
Bixby Vision shopping

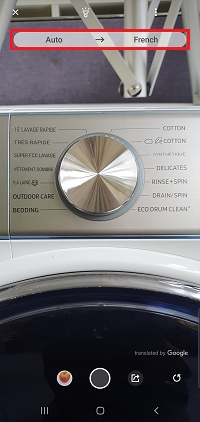
Translation: this will translate written language to a language supported by Bixby

Please note: this feature will only work with certain languages and fonts
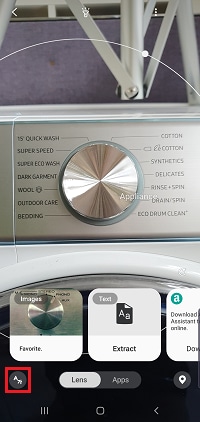
1 Tap the translate button. It is in the bottom left of the screen
Tap the translate button
2 Bixby Vision will automatically detect the language it is seeing. Tap the language options to change what language it is being translated to
Tap the language options to change the translations languages

Identify landmarks and businesses: use your camera to find businesses and landmarks and learn more about them
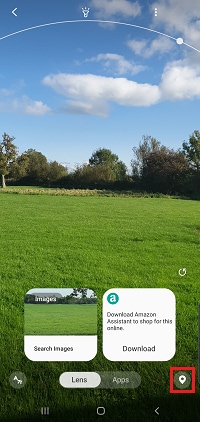
1 Tap the location icon. It will be in the bottom right corner
Tap the location icn
2 Using your GPS location, Bixby Vision will display icons for the landmarks and businesses in the area. Tap an icon to learn more about it

Please note: landmark and business icons are displayed according to their location. You may have to look around to see everything in your area
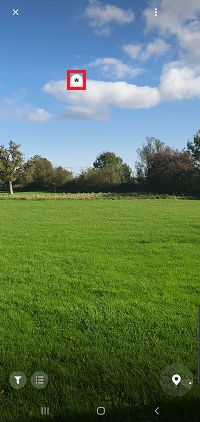
Tap an icon to learn more about it

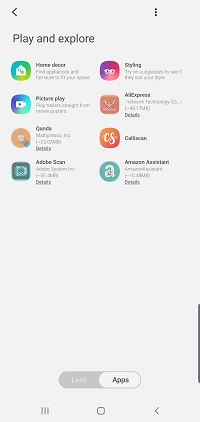
AR experiences and add-on apps: use your camera to try on makeup, clothing, redecorate your home and more
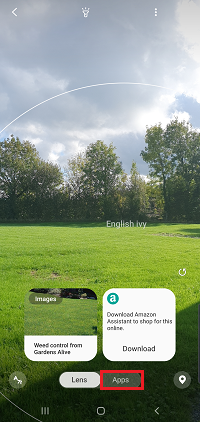
1 Tap Apps
Tap Apps
2 Tap the app you wish to use. Some may have to be downloaded
Tap the app you want to use

If you wish, you can create an app shortcut that will let you launch Bixby Vision with just one tap.

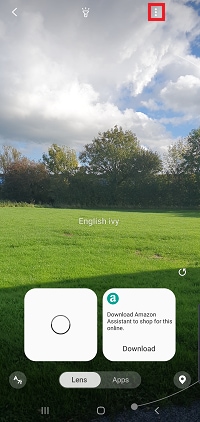
1 Turn on Bixby Vision in the camera app
Tap Bixby Vision
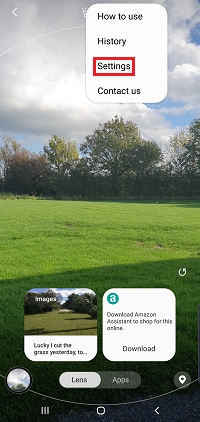
2 Tap menu, this will appear as three dots in the upper right corner
Tap menu
3 Tap Settings
Tap settings
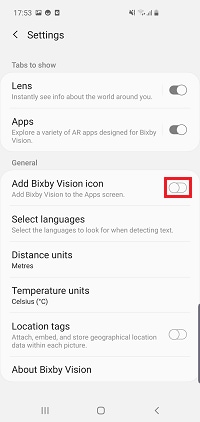
4 Tap the switch to create or remove a shortcut to Bixby Vision
Use the switch to enable or disable the Bixby Vision shortcut

Currently Bixby Vision is available on the following devices:

  • Galaxy Z Flip
  • Galaxy S20 range
  • Galaxy A90 5G
  • Galaxy A71
  • Galaxy A51
  • Galaxy Note10 range
  • Galaxy S10 range
  • Galaxy Note9
  • Galaxy S9 and S9+
  • Galaxy Note8
  • Galaxy S8 and S8+
  • Galaxy A80
  • Galaxy A70
  • Galaxy A60
  • Galaxy A50
  • Galaxy A8 and A8+ (2018)
  • Galaxy A7 (2018)
  • Galaxy A5 (2018)
  • Galaxy J7+
  • Galaxy A6 and A6+
  • Galaxy Tab S5e
  • Galaxy S4
Bixby Voice header

Bixby Voice

Bixby Voice allows you to control your phone and make commands by speaking aloud. Bixby Voice has access to most of your settings and can access many of your apps, making it quicker and easier to customise and use your phone. You can even create quick commands that can activate a whole range of features with a single word.

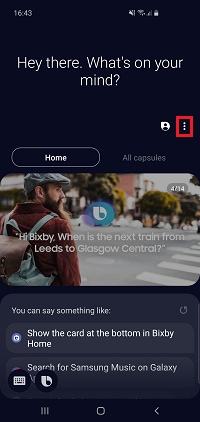
 

1 Press the Bixby key or side key to activate Bixby
Side and Bixby button
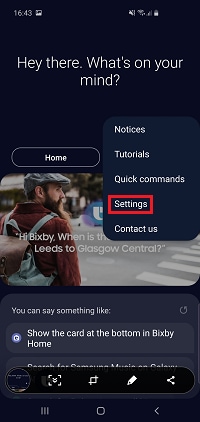
2 Tap the menu icon. This will appear as three dots in the upper right of the screen
Ta the menu icon
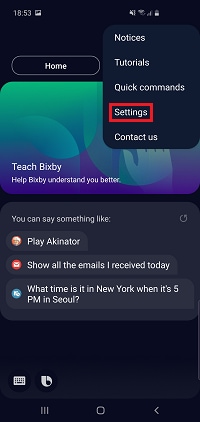
3 Tap Settings
Tap Settings
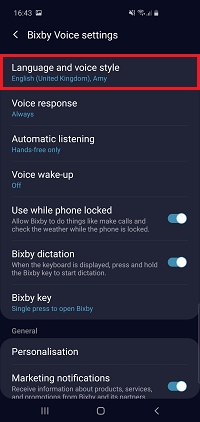
4 Tap Language and voice style
Tap language and voice style
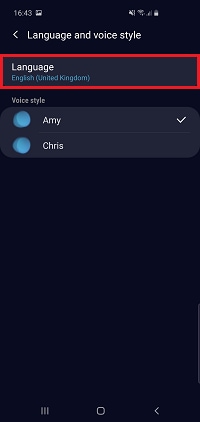
5 Tap Language
Tap Language
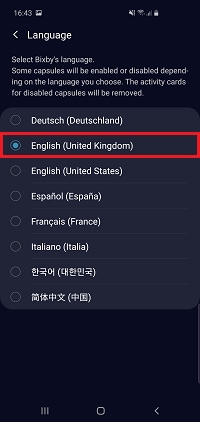
6 Tap the language you want to use
Tap the language you want to use
1 Press or press and hold the Bixby key or side key
Press and hold the Bixby button or side button on the side of your device
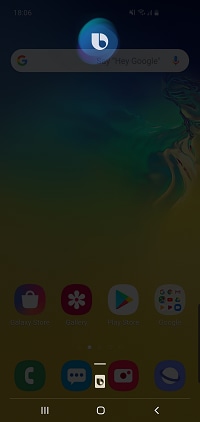
2 The Bixby logo will appear on your screen to indicate that Bixby is listening. You can now ask your question
Bixby logo
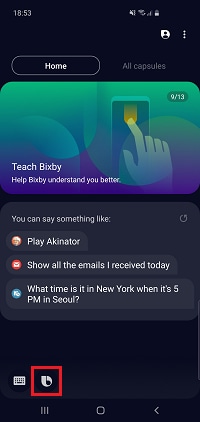
3 Tap the Bixby logo in the bottom of the screen to ask Bixby another question
Tap the Bixby logo

Bixby can be activated by saying "Hi Bixby" rather than pressing a button. This means that you can speak to Bixby without ever having to touch your phone, making it ideal for use while driving or using wireless headphones. This feature can be turned on in your Bixby settings.

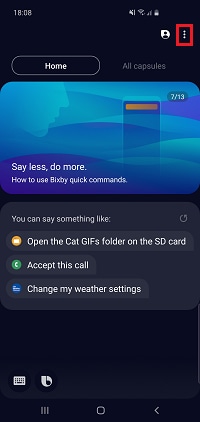
1 Press the Bixby key or the side key to open Bixby
Bixby button and side button
2 Tap the menu icon. This will appear as three dots in the upper right of the screen
Tap the menu icon
3 Tap Settings
Tap Settings
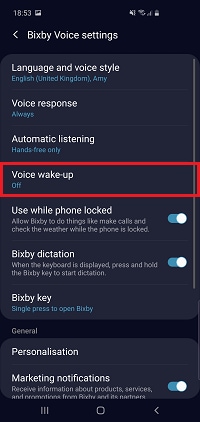
4 Tap Voice wake-up
Tap Voice wake-up
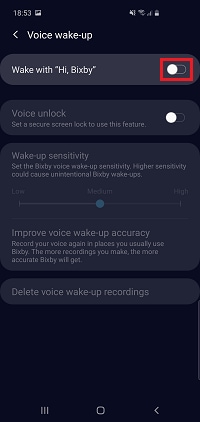
5 Tap the switch to turn Voice wake-up on
Tap the switch

Quick Commands allow you to create your own, personalised command for Bixby. This allows for multiple commands to activated by a single word or phrase, making long commands easier to say.

1 Press the Bixby key or side key to open Bixby
Bixby button and side button
2 Tap the menuicon. This will appear as three dots in the upper right of the screen
Tap the menu icon
3 Tap Quick commands
Tap Quick commands
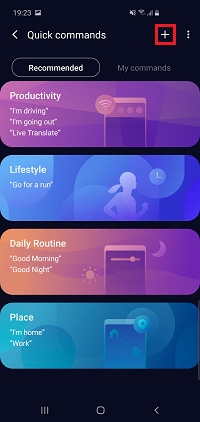
4 Tap a command to activate it or tap the + icon to create your own
Tap the + icon
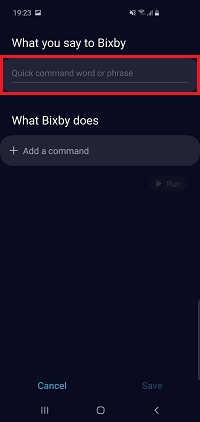
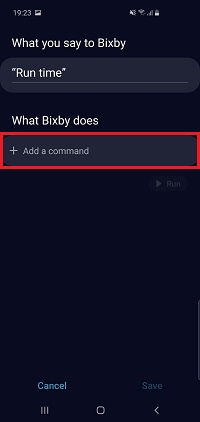
5 Enter what you want to say to activate your command
Enter the name of your command
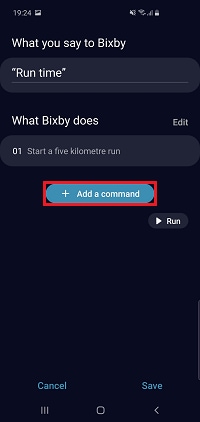
6 Tap + Add a command
Tap + Add a command
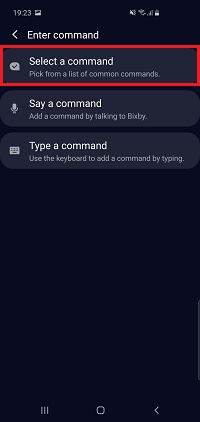
7 You can enter a command by picking from common commands, saying a command aloud or by typing your command. In this example we are selecting a common command
Choose how you want to enter your command
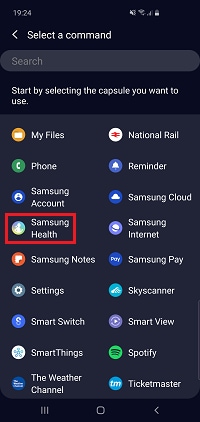
8 Tap the app you want to command
Tap the app you want to command
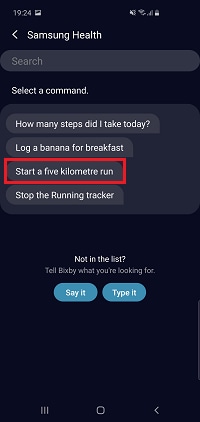
9 Tap the Command you want to use
Tap the command you want to use
10 Tap + Add a command again, to add another command to your quick command
Tap + Add a command again to add another command to your quick command
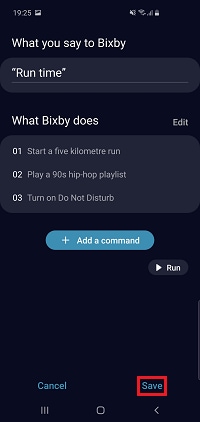
11 Once you are happy with your quick command tap Save
Tap Save once you are happy with your quick command

Your quick command can now be activated using the word or phrase you chose.

Bixby was first introduced with the launch of the S8 and S8+ and has featured on many Samsung devices since.

Currently, Bixby is available on the following devices:

Smartphones

  • Galaxy Z Flip
  • Galaxy S20 ranger
  • Galaxy Fold 5G
  • Galaxy Note10 range
  • Galaxy S9, S9+
  • Galaxy S8, S8+
  • Galaxy Note9
  • Galaxy A90 5G
  • Galaxy A80
  • Galaxy A71
  • Galaxy A70
  • Galaxy A51
  • Galaxy A50
  • Galaxy A7 (2018)
  • Galaxy A9 (2018)
  • Galaxy J7+ (2017)
  • Galaxy J6 (2018)
  • Galaxy J6+ (2018)

Tablets

  • Galaxy Tab S6
  • Galaxy Tab S5e
  • Galaxy Tab S4

Wearables

  • Galaxy Watch Active2
  • Galaxy Watch Active
  • Galaxy Watch
Bixby Routines header

Bixby Routines

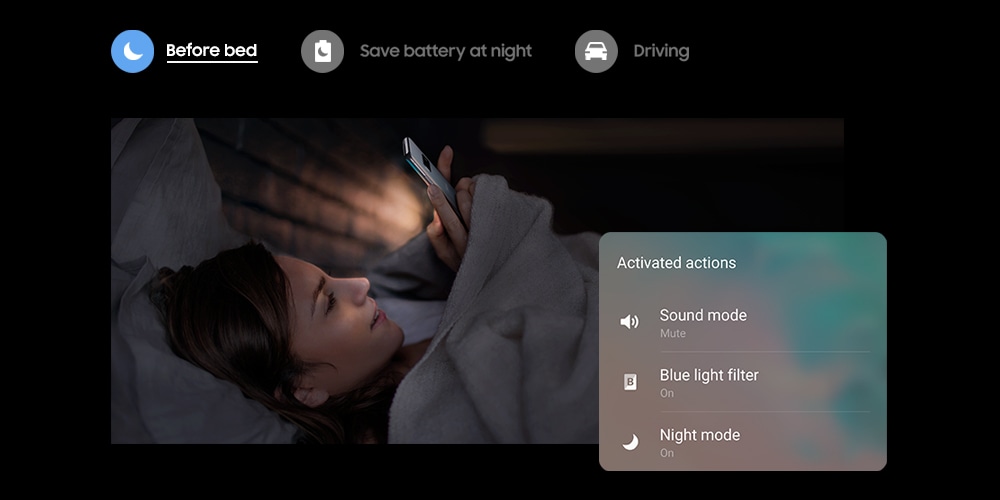
Bixby Routines use machine intelligence to learn your specific usage patterns and preferences. Bixby can then use this to automatically adjust your settings, control apps, optimise the battery, and much more. 

You can also manually set up routines yourself based on where you are and what you’re doing. For example, you could create a ‘good night’ routine so that at a certain time your phone turns on mute, night mode comes on, and your lock screen shortcuts change.

Please note: to use Bixby Routines you will need to log into your Samsung account and have your location settings switched on

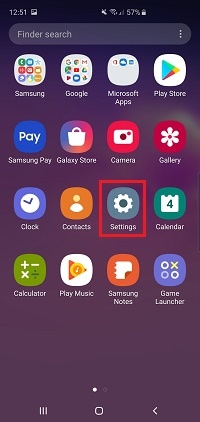
1 Swipe up on the homes screen, to access your apps
From the home screen, choose <strong>Apps</strong> or swipe up to access your apps.
2 Tap Settings
Tap Settings
3 Tap Advanced features
Tap Advanced features
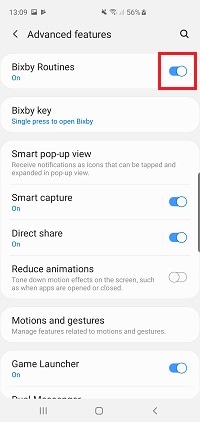
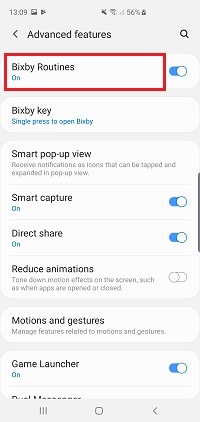
4 Tap the switch to enable or disable Bixby Routines
Tap Bixby Routines

Bixby may start recommending some appropriate routines for you once it has learnt your usage patterns. These recommendations will be suggested through notifications that appear at the top of your screen.

If you are recommended a routine that you want to use, you will need to add it to your routines.
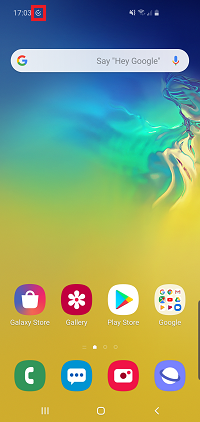
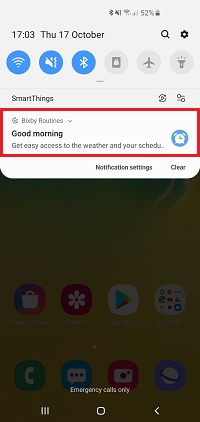
1 Wait until Bixby routines send you a notification. The notification icon for Bixby routines looks like a circle with a tick inside
Bixby routine notification
2 Pull down your notification bar by swiping down from the top of the screen. Tap the notification card to see more
Tap the notification card to see more information
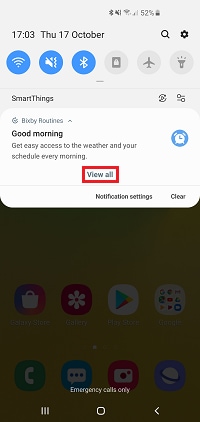
3 Tap View all
Tap View all
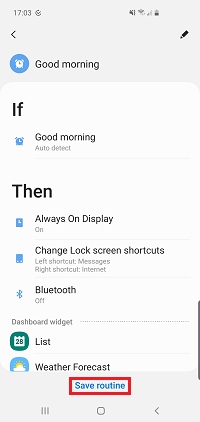
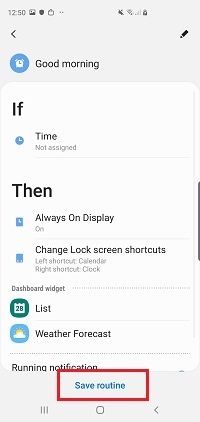
4 Adjust the routine to your preference, then tap Save routine
Tap Save routine
1 Swipe up on the home screen, to access your apps
From the home screen, choose <strong>Apps</strong> or swipe up to access your apps.
2 Tap Settings
Tap Settings
3 Tap Advanced features
Tap Advanced features
4 Tap Bixby Routines
Tap Bixby Routines
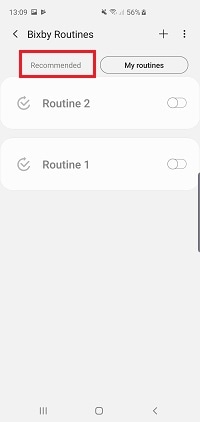
5 Tap Recommended
Tap Recommended
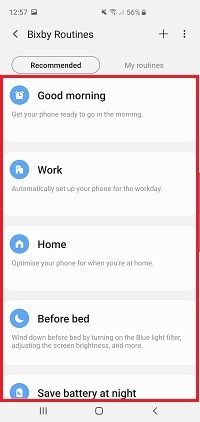
6 Choose one of the routines from the list of recommendations
Choose one of the routines from the preset list
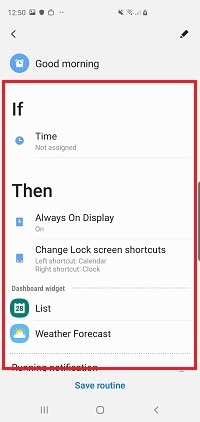
7 Adjust the “If” and “Then” according to your requirements
Adjust the IF and and Then according to your requirements
8 Tap Save routine
Tap Save routine
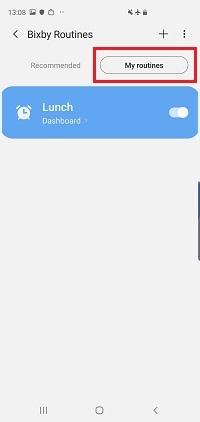
9 The new routine will now show in My routines
The routine will now show in my routines
1 Swipe up on the home screen, to access your apps
From the home screen, choose <strong>Apps</strong> or swipe up to access your apps.
2 Tap Settings
Tap Settings
3 Tap Advanced features
Tap Advanced features
4 Tap Bixby Routines
Tap Bixby Routines
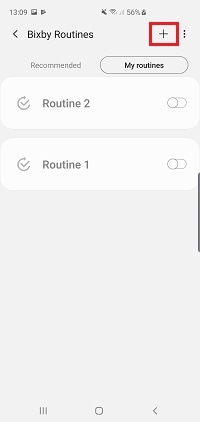
5 Tap the + icon
Tap the + (plus) icon
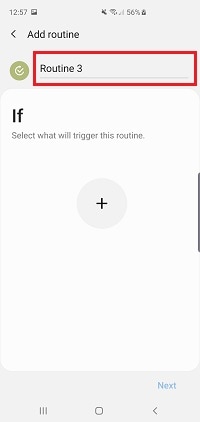
6 Enter a name for your routine
Enter a Routine name
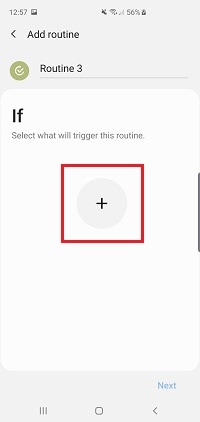
7 Tap the + icon to set the conditions
Tap the plus (+) icon to set the conditions
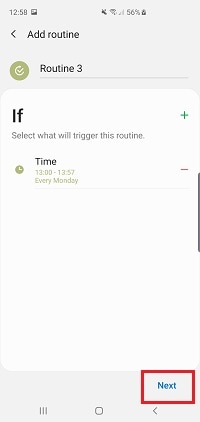
8 Tap Next
Tap Next
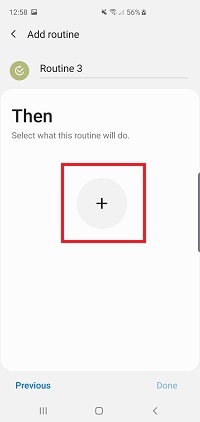
9 Tap the + icon to set the action
Tap the plus (+) icon to set the action
10 Tap Done

Please note: you can add manual routines to the home screen as widgets to access them quickly. When prompted to do this, tap Add
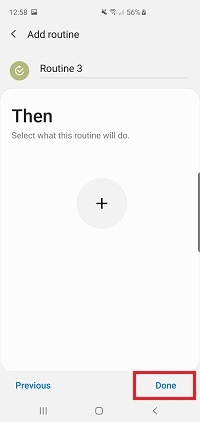
Tap Done
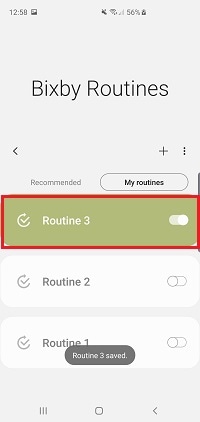
11 The routine will now show in My Routines
The routine will now show in My Routines
1 Swipe up on the home screen, to access your apps
From the home screen, choose <strong>Apps</strong> or swipe up to access your apps.
2 Tap Settings
Tap Settings
3 Tap Advanced features
Tap Advanced features
4 Tap Bixby Routines
Tap Bixby Routines
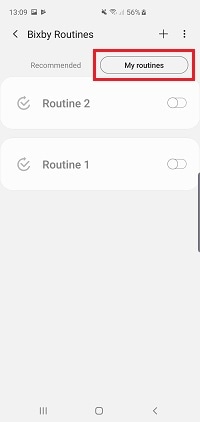
5 Tap My routines
Tap My Routines
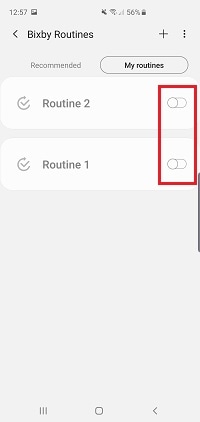
6 Tap the switch to enable or disable a routine
Use the toggle to enable or disable the routines

If the routine is currently running, you can temporaily switch it off through your notifications:
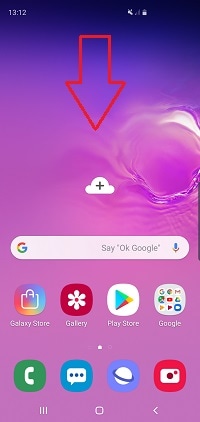
1 Swipe down from the top of the screen, to pull down the notification panel
Pull down the notification panel
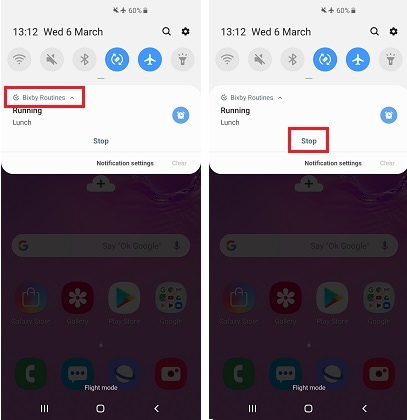
2 Tap the Bixby Routines notification, then tap Stop
Expand the notification , then tap stop
1 Swipe up on the home screen, to access your apps
From the home screen, choose <strong>Apps</strong> or swipe up to access your apps.
2 Tap Settings
Tap Settings
3 Tap Advanced features
Tap Advanced features
4 Tap Bixby Routines
Tap Bixby Routines
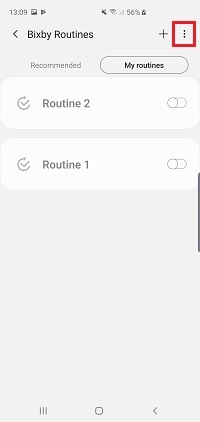
5 Tap the menu icon. This will appear as three dots in the upper right corner of the screen
Tap menu
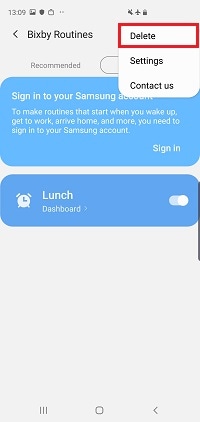
6 Tap Delete
Tap Delete
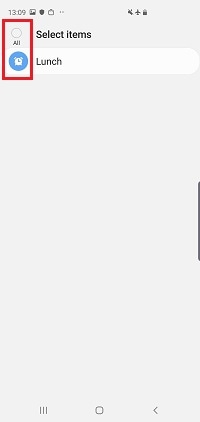
7 Tap the routine you wish to remove or tap select all
Select the routine you wish to remove or tap select all
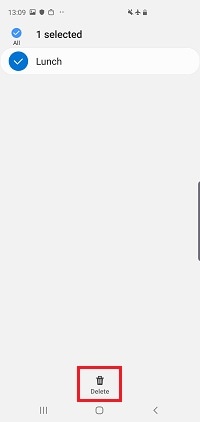
8 Tap Delete to confirm
Tap delete


If you're experiencing unusual behaviour on Samsung mobiles, tablets or wearables, you can send us an error report or ask us a question in the Samsung Members app.


This allows us to a closer look at what is happening. The data is anonymised and only held for the duration of the investigation. Find out more about sending an error report through the Samsung Members app.

Thank you for your feedback!