Securely mount your Samsung monitor on the wall

Are you interested in mounting your computer monitor but worried it may fall? You can put your mind at ease because almost all Samsung monitors are VESA compatible! VESA is a standard used for mounting electronics, such as monitors or TVs. In other words, the monitors are designed to be hung up and remain sturdy. Follow this guide to learn how to mount your VESA-compliant monitor, no matter what model you have.
Hang up your monitor
If your Samsung monitor is VESA compatible (which most of them are), it will come with pre-drilled holes that can be used for mounting. However, the majority of models do not come with a wall mount kit, and you will need to buy one separately. Make sure the kit is also VESA compatible and, when constructed, allows the monitor to be at least 10cm away from the wall. Please refer to your monitor's user manual to find out what other supplies are needed for mounting your specific model and any other important information, such as the necessary screw size.
Once you have a compatible kit and the necessary tools, you can begin mounting your monitor!
First, choose where you are going to mount the monitor on the wall. Use a stud finder to make sure there is a stud in that location. A stud will ensure the monitor will remain sturdy. When you find a stud, mark the position so you won’t lose it.
Before moving on to the next step, double check you’ll be able to comfortably use the monitor in this location. For example, try sitting at your desk to see if the monitor is at the correct height.
Place the mount against the wall and use a level to keep the mount straight.
Next, use a pencil to mark where you will drill holes for the mount. When you’re ready, use a drill to create holes in the places you marked on the wall.

Align the mount with the holes again and then drill the screws into the holes, securing the mount to the wall.
If you haven't already, turn off the monitor, remove the power cable from the outlet, and disconnect the stand base from the monitor.
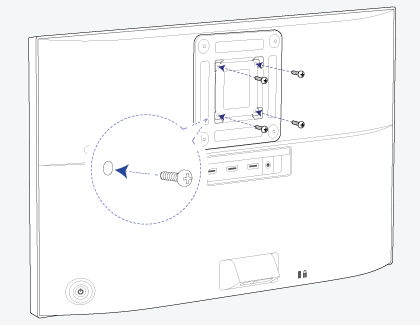
On some models, you may need to attach a provided inlay to the designated position. If you are unsure, please see your user manual for specifics.
Note: You can skip this step if it does not apply to your model.
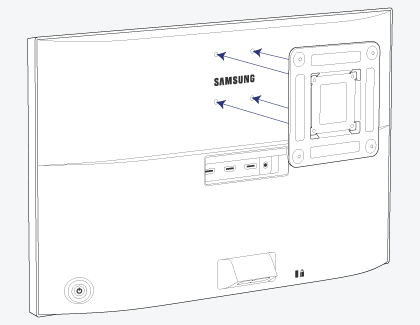
Place the mounting bracket over the holes on the back of the monitor, making sure the holes and grooves are lined up.

Place the screws that came with the mounting kit in the holes and tightly fasten them, so the bracket becomes attached to the monitor.

Carefully lift the monitor, and then align the bracket with the mount on the wall.
Finally, attach the bracket to the mount. If you are unsure how to complete this last step, please refer to the mounting kit’s instructions.
Contact Samsung Support


