1. Unbox your TV
What you'll need:
A large flat table. You'll need to lay the TV facedown to install the stand, so using a table is preferable to the floor. (Models smaller than 75")
A soft blanket for covering the table to protect the screen.
Someone to help you take the TV out of the box.
Note: The following steps apply to any TV model or size, and for additonal information a list of unboxing videos is available.
1. After you open the box, the Quick Setup Guide is the first thing you'll see. Open this to get an overview of the stand installation steps and a list of parts included with your TV.
2. Next, remove the bag that contains your remote, power cord, stand screws, user manual, and other items (depending on the model).
3. If your TV came with a rechargable remote, start charging it with a USB-C charger so it's ready to use once it's time to turn on the TV. If your remote uses batteries, insert the included batteries.
4. Remove the parts for the TV stand and the top piece of foam.
5. Have your helper grip the edge of the TV screen with two hands, while you grip the opposite side. Lift the screen out of the box and lay the TV screen facedown on your blanket-covered table.
Note: If your TV is 75" or larger you will leave it in the bottom of the box and install the stand while the screen stays in the box (as depicted in the video). Refer to the Quick Start Guide for specific steps. More videos for different size variations are available here.
2. Install your TV
On the included stand
Refer to the Quick Setup Guide for the stand installation steps for your specific TV. Here are some important tips:
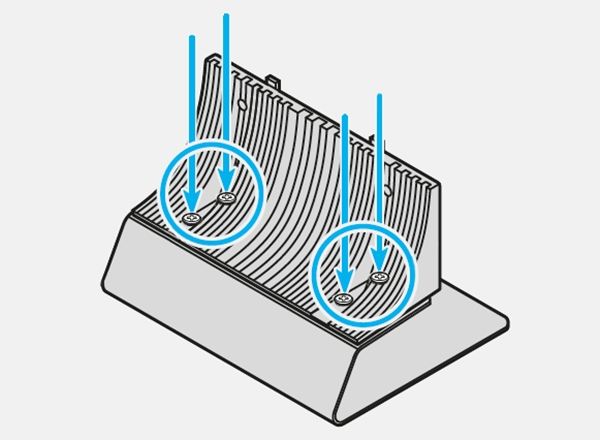
In most cases, you need to assemble the stand before attaching it to your TV, but follow the steps in your Quick Setup Guide to assemble the stand properly.
When assembling the stand, the screws always go in from the top, not the bottom.
Not all of our TV stands require screws. Some just click into the TV.
On the wall
For a deep dive into everything you may want to consider before mounting your TV, check out our full guide.
What you'll need:
Stud finder
Carpenter's level
Tape measure
Phillips head screw driver
Power drill
Someone to help
3. Turn on your TV
Before turning on the TV for the first time:
Connect the One Connect Box if your TV uses one.
Connect an Ethernet cable from your modem or router if you are not using wireless internet.
Connect any external devices (video game consoles, video streaming devices, cable or satellite boxes, and Blu-ray players). Your TV will automatically recognize your external devices during the setup.
Plug in the power cord.
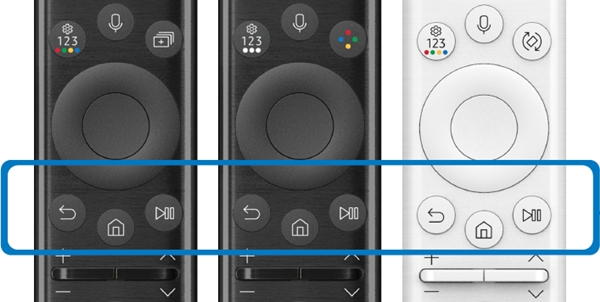
Turn on your TV and external devices. If the TV is not responding to your remote, you'll need to pair it (stand within 2 feet of the TV and press and hold Return and Play/Pause until your TV shows that the remote is paired).
The next few steps may vary in order depending on the model you have. It's simplest to just follow the directions on your TV screen and let us provide any additional information you may need.
1. Select your preferred language.
2. There are two simple options for setting up your TV. Select either Smartphone or Remote.
Smartphone setup
When you're using your phone for setup, SmartThings is required. Samsung smartphones come with SmartThings preinstalled, but iPhone or other android devices will require it to be downloaded. Your Wi-Fi settings from your phone and the Samsung Account* you use for SmartThings will be added to your TV automatically during setup. Make sure your phone is connected to the same Wi-Fi you want your TV to connect to before you begin.
1. Using your TV remote, select Smartphone and then scan the QR code with your phone. If you have a Samsung phone, this will automatically open SmartThings, and if not you will be asked to download SmartThings before continuing.
2. Select a location and room for your Screen and then touch Next. When this setup is complete, your TV will be added to SmartThings.
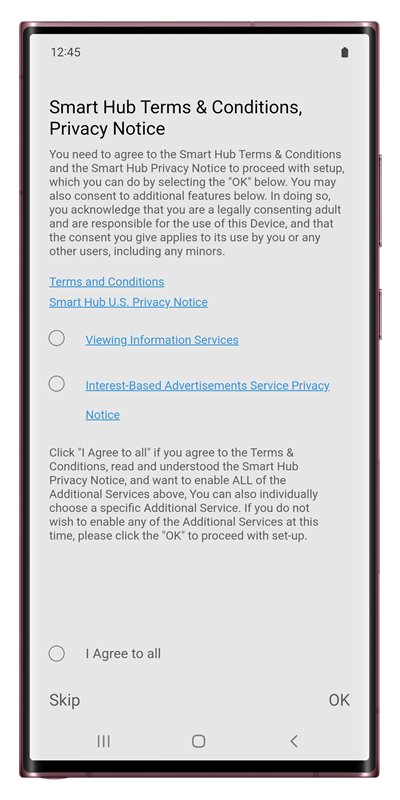
3. Next, read through the Smart Hub Terms and Conditions and Privacy Notice when it displays. Touch I Agree to all and then Ok to continue, or Skip if you are not interested. You must agree to terms in order to use this service.
4. Name your device to make it easier to recognize amongst the other devices or TVs in your home. Then touch Next.
5. Select a voice assistance service that you want to use on your TV. Available options are Bixby or Amazon Alexa. Or touch Choose Later, then touch Next, and check out our guide.
6. If you want to make a backup of General information and the Home Screen settings touch I agree to the storage of backup data and then touch Next, or touch Skip if you are not interested.
7. You will be reminded to plug in your external devices and turn them on. Touch Next and your TV will automatically setup your devices while you complete the rest of the TV setup.
8. If a backup from a previous TV is found, you will be given the chance to restore it here. Check the items you want to restore and touch Restore. If there is no backup available, this will be skipped automatically.
9. Confirm your location by zip code. This is to ensure your TV service is correct for your location.
10. Link your favorite apps. On your phone, log in and it will be automatically linked and signed in on your TV. Touch Next to continue.
11. You may be presented with some additional features like Active Voice Amplifier or Adaptive Picture. These features are not available on all TVs. You can choose to Enable Now or Later.
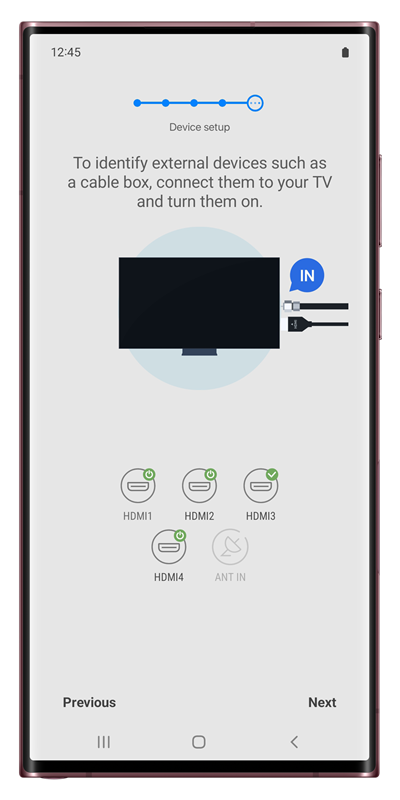
12. You may be notified of some additional features that are available for you according to your Samsung Account. These can vary, but the details are available on your TV screen. Accept the terms and touch Agree or touch Skip.
13. You will be asked if you want to set up a cable or satellite box. Touch set up and follow the instructions to continue or touch No cable box. Your TV is now set up.
Remote setup
1. Use your TV remote to select Remote Control then continue the setup process.
2. Your TV will remind you to plug in your external devices and turn them on. Select Start Auto Setup and your TV will automatically setup your devices while you complete the rest of the TV setup.
3. Select whether you want to connect your TV to the internet via a Wireless or Wired connection. A Samsung Account is required.*
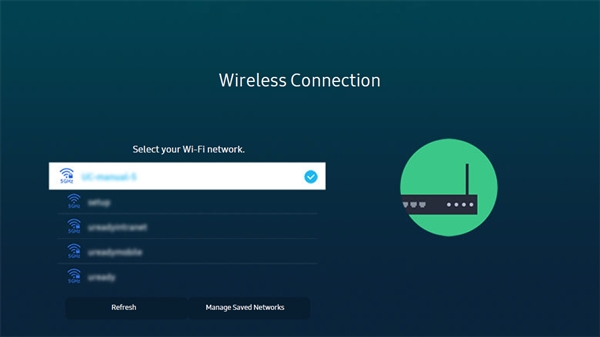
For Wireless: Select your network name from the list of networks detected by your TV, enter your Wi-Fi password using the on-screen keyboard, and then select Done or Go.
For Wired: Your TV should connect automatically since you already connected the Ethernet cable, if not you need to connect an Ethernet cable from your router. Check out our full guide for more details.
4. Next, read through the Smart Hub Terms and Conditions and Privacy Notice when it displays. Select I Agree to all and then Ok to continue, or Skip if you are not interested. You must agree to terms in order to use Smart Hub.
5. The TV will check for updates and install them. Having the updated software will ensure that you have the latest features available for your TV. You can also skip this step for now and update your TV's software later.
6. Sign into a Samsung Account. Signing into your Samsung Account will make registering your TV much easier as it will be automatically added to your products. Select either Use Existing Account or Create New Account. Follow the onscreen instructions to get signed in. If you'd like to skip, press right on the remote to highlight Skip, but consider setting up a Samsung Account later.
7. You may be notified of some additional features that are available for you according to your Samsung Account. Accept the terms and select Agree or select Skip.
8. Your TV will ask if you want to make a backup of General information and the Home Screen settings. This can be restored if you reset this TV, or brought forward to a new TV that you purchase. Check Back up data and then select Back Up. If a backup from a previous TV is found, you will be given the chance to restore here too. Check the items you want to restore and select Restore. If there is no backup available, this will be skipped automatically.
9. Your TV will show that it has completed setup of your connected devices and which devices can be controlled with your Smart Remote. Select Next.
10. Select a voice assistance service that you want to use on your TV. The available options are Bixby or Amazon Alexa. If you want to do this later, select Later and check out our guide.
11. Link your favorite apps. So many of your favorite apps are available on your Samsung TV. Take a moment to get logged into your favorites before completing the setup. Select the app you want to sign up for or log in to and follow the on-screen instructions. Select Skip to continue the setup.
12. You may be presented with some additional features like Active Voice Amplifier or Adaptive Picture. These features are not available on all TVs. You can choose to Enable Now or Later. Your TV Setup is now complete.
4. Get the most out of your TV
Check out our printable TV info sheet to keep track of your account passwords, HDMI sources, and get quick access to some helpful articles!
Find something to watch
Scan for channels: Connect your cable source or an antenna and scan to add local channels.
Download apps: Download apps and learn how to lock, manage, or remove unwanted apps from your TV.
Check out Samsung TV Plus: Free TV, no strings attached. Get instant access to news, sports, entertainment, and more.
Setup and control your devices
Connect your devices: Use your TV's Connection Guide to learn how to connect your devices.
Control your devices: Learn how to control connected devices with the universal remote feature.
Connect a Samsung Soundbar: A soundbar amps up your TV by providing awesome sound quality.
Get to know the settings menu
Set parental controls: Learn how to block inappropriate content and what settings are available.
Adjust picture settings: Learn about available picture settings on your TV.
Enable closed captions: Learn how to use closed captions and accessibility options.
Use your phone with your TV
Use AirPlay: Learn how to stream content like music, videos, and photos from your iPhone.
Use Multiview: Watch your TV and stream content from your phone at the same time.
Use Tap view: Set up in the SmartThings app and on your TV to transfer your phone’s screen with a simple tap.
Take care of your TV
Register your product: Stay up to date on system updates and manage your warranty status.
Create a Samsung Account: Backup, restore, and sync data across multiple devices, find lost devices, and access exclusive apps.
Clean your TV: Learn the best way to clean fingerprints and smudges from your screen.
* A Samsung Account is required for network-based smart services, including streaming apps and other smart features. A separate (connected) computer, mobile, or other device may be necessary to create/log in to a Samsung Account. Without an Account login, only external device connections (e.g., via HDMI) and terrestrial/over-the-air TV (only for TVs with tuners) are available. If you do not have a Samsung Account, you can easily create one here: https://account.samsung.com/membership/intro it’s free to sign up; terms apply.
Other answers that might help
Thank you for your feedback!
Thank you for your feedback! Your comment has been submitted.
Contact Samsung Support
