Use the Samsung Internet app on your Galaxy phone or tablet
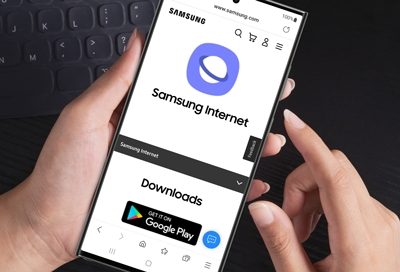
Samsung Internet is a fast and convenient web browser app for Galaxy phones or tablets. It lets you search for and view your favorite webpages, as well as save them for later. Plus, Samsung Internet comes with security features like Ad blockers and Secret mode, so you’ll feel comfortable when browsing websites. You can also customize Samsung Internet to load your favorite website when you open the app. You can see our newest Galaxy phones and tablets available on our website.
Navigate Samsung Internet
The navigation bar in Samsung Internet is similar to what you’d see on a desktop browser. You can search for new websites, share them, and save them to your bookmark list.
Navigate to and open the Samsung Internet app. If desired, you can help improve the app by reporting errors. Then, tap Agree.
You can set Samsung Internet as your default browser by tapping Continue. Otherwise, tap Not now.
The following functions are available in Samsung Internet:
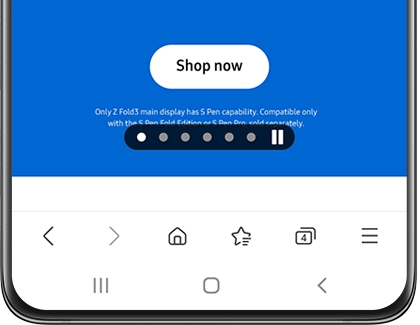
Bookmark icon: Used to bookmark the current page. This is located in the top left corner.
Reload icon: Used to reload the current page.
Back arrow: Used to navigate back one page.
Home icon: Used to return to your Homepage. Please see the "Customize the Homepage" section for more information.
Address bar: Used to search for a new web address.
Forward arrow: Used to navigate forward one page.
Bookmark list: Used to see your bookmarks. This is located on the bottom of the screen.
Menu: Opens additional options and settings.
Tabs icon: Used to open your current tabs.
You can also add the Samsung Internet Search widget to your device’s Home screen. The widget allows you to check your recent browsing history as well. For more information about adding widgets, check out our Home screen guide.
Customize the Homepage
The Homepage in Samsung Internet is the page that loads when you first open the app. If there is a certain page you’d like to see right away, you can customize the Homepage to your liking.
Open the Samsung Internet app, tap Menu (the three horizontal lines), and then tap Settings. Next, tap Homepage. The following options will be available:
Default: The default Homepage in Samsung Internet will vary depending on what carrier you have; select this option to keep the current default page as your Homepage.
Quick access: Your Homepage will have a selection of links to different pages, such as news articles and social media apps.
Current page: The page you are currently viewing will be set as your Homepage. For example, if you are currently viewing a news website, it will become your Homepage.
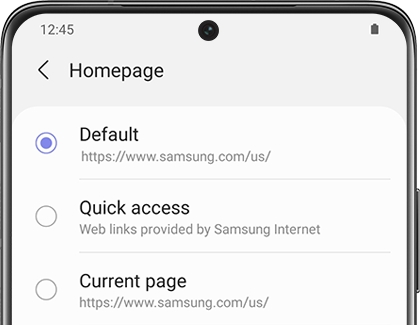
Custom page: You can enter a web address of your choice to set as the Homepage. Tap Save when you’re finished.
Use bookmarks
Saving a web page to your bookmarks will let you find and open it later. You can also organize your bookmarks if you have a lot of them.
Navigate to and open the Samsung Internet app, and then open a web page that you’d like to save to your bookmarks.
Tap the bookmark icon (the star in the top left), and then tap the bookmark list icon (the star in the bottom toolbar). You will see all of your bookmarks.

To rename a bookmark, tap More options (the three vertical dots), and then tap Edit.
Select your desired bookmark, tap Edit at the bottom, and then enter a new name for the bookmark. You can also edit the web address. Tap Save to confirm.
To create a folder for your bookmarks, tap More options (the three vertical dots), and then tap Create folder.
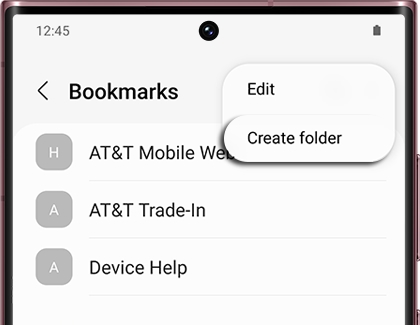
Enter a name for the folder, and then tap Create.
Next, tap More options (the three vertical dots) again, and then tap Edit.
Select the bookmark(s) you’d like to add to the new folder. You can also select All at the top. Tap Move, and then tap the new folder. Tap Select to move the bookmarks into the folder.
Manage your tabs
Tabs allow you to have multiple web pages open at once. This makes it easy to keep track of your favorite or most visited websites.
Navigate to and open the Samsung Internet app, and then tap the tabs icon in the bottom toolbar (it looks like a box with a number).
You may be prompted to choose from List, Stack, or Grid. Make your selection, and then tap OK. Then, tap New tab to select a new page you’d like to open; the page will open automatically.
To view all of your currently opened tabs, tap the tabs icon again.

To close a tab, tap the close icon (the x) in the top right corner of the tab. If you need to close all of your tabs, tap More options (the three vertical dots), and then tap Close all tabs. Tap Close to confirm.
To reopen a tab you just closed, tap More options (the three vertical dots) again, then tap Reopen closed tab, and then select the tab.
To change how the tabs are displayed, reopen all of your tabs, and then tap More options (the three vertical dots). Tap View as, and then choose either List, Stack, or Grid. Tap OK to confirm.
Clear your history, cache, and cookies
Note: After clearing your data, you may need to log in to certain websites again. Please make a note of your login information before clearing any data.
If a web page isn't loading or working properly, you can try clearing your browser history, cache, and cookies.
Navigate to and open the Samsung Internet app, and then tap Menu (the three horizontal lines).
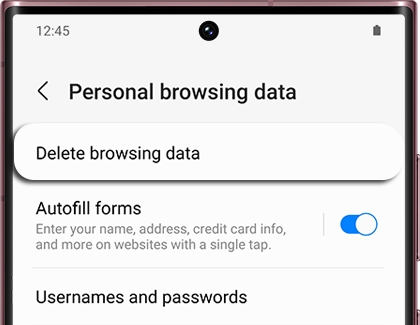
Tap Settings, then tap Personal browsing data, and then tap Delete browsing data.
Select the data you would like to clear, such as Browsing history, Cookies and site data, or Passwords.
Tap Delete data, and then tap Delete to confirm.
Add your autofill information
If you don’t want to type in your personal information every time you visit a website, you can use autofill forms to automatically save your info.
Navigate to and open the Samsung Internet app, and then tap Menu (the three horizontal lines).
Tap Settings, then tap Personal browsing data, and then tap Autofill forms. Tap the switch at the top to turn it on.

Tap Profiles, and then tap Add. From here, you can input personal information such as your name, address, phone number, and email. Tap Save when you’re finished.
Next, tap Credit and debit cards to add your card details.
Note: You will need to use fingerprint recognition to add card information. If you have not set this up yet, tap Continue and then follow the on-screen instructions.
Now, when you are prompted to enter certain information on a web page, the autofill option will appear. You can select it to automatically fill in your saved information.
Use Ad blockers
Ad blockers are apps in Samsung Internet that will prevent ads from appearing when you’re browsing. Keep in mind that some Ad blockers are free, while others will cost a few dollars.
Open the Samsung Internet app, tap Menu (the three horizontal lines), and then tap Ad blockers.
You’ll see a list of Ad blockers. Tap the Install icon next to your desired Ad blocker to begin downloading it. You can also tap the name of the Ad blocker to view more information.
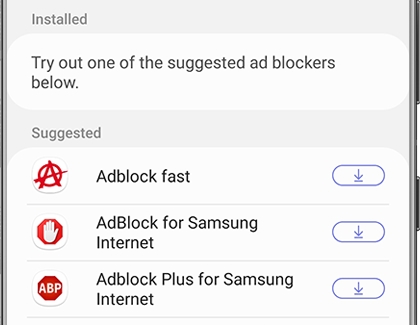
Once the Ad blocker is installed, it will be automatically turned on and added to the Installed list. To enable or disable the Ad blocker, tap the switch next to it.
You can install additional Ad blockers if you wish.
For more information about protecting your Galaxy device, please see our malware guide.
Use Secret mode
The Secret mode option allows you to browse and search for websites without any of your data being saved.
Navigate to and open the Samsung Internet app, and then tap the tabs icon in the bottom toolbar (it looks like a box with a number).
Tap Turn on Secret mode, and then tap Start.
Note: If desired, you can also tap the switch next to Lock Secret mode. This will prompt you to create a password that must be entered when using Secret mode.

Tap Start, and a new tab will open. When using Secret mode, the tabs will be gray. You can now browse and search for websites.
To adjust your settings, tap More options (the three vertical dots) from the Tabs screen, and then tap Secret mode settings.
From here, you can turn on a password or use face or fingerprint biometrics. You can also reset Secret mode.
Tap Back, and then tap Turn off Secret mode when you are finished using Secret mode.
Use the browsing privacy dashboard
If you’re concerned about being tracked or accidentally opening malicious websites, you can check the browsing privacy dashboard in Samsung Internet. It’ll give you quick access to privacy information for all of your visited websites.
Navigate to and open the Samsung Internet app, and then tap Menu (the three horizontal lines).
Tap Privacy to view the browsing privacy dashboard.
From this screen, you will see the amount of blocked content. You can customize options for Smart anti-tracking, Block backward redirections, Block pop-ups, and Block apps from opening Internet.
Swipe up for additional safety options, such as Warn about malicious sites and Block automatic downloads.
If you would like to start over with your privacy settings, tap Reset privacy settings at the bottom of the screen. Tap Reset to confirm.

Browsing assist with Galaxy AI
Introduced with the Galaxy S24, Browsing assist in Samsung Internet can make content on webpages easy to understand.
Summarize a webpage
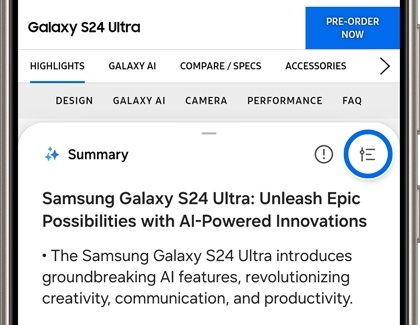
When you come across a webpage dense with information, you can have Samsung Internet generate a summary of the contents. Tap the Browsing assist icon on any page, and then tap Summarize.
If you’d like more detail in your summary, tap the Summary style icon, and then you can choose between a Standard or Detailed summary.
Translate a webpage
Galaxy AI with Samsung Internet can also translate webpages into your native language, or any other supported language. Tap the Browsing assist icon on any page, and then tap Translate.
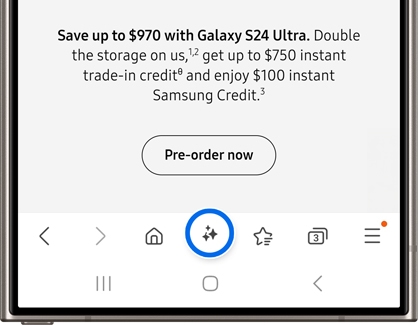
You may be prompted to download a language pack to support the language. If so, tap Download. If you’d like to translate into another language, tap the language drop-down at the top of the screen, and then tap the language you’d like to use. Don’t see your language? Tap + Add languages to see the list of supported languages. Tap the Download icon next to the language you’d like to use.
-
Mobile 8 AM - 12 AM EST 7 days a week
-
Home Electronics & Appliance 8 AM - 12 AM EST 7 days a week
-
IT/Computing 8 AM - 9 PM EST 7 days a week
-
Text Support 24 hours a day 7 Days a Week
Contact Samsung Support


