Set up your new Bespoke Jet Bot Combo robot vacuum and mop
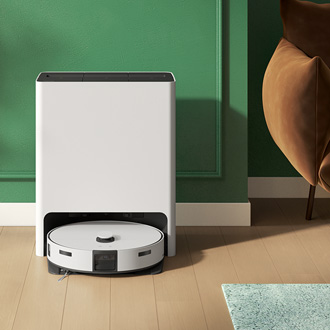
Set up your new Bespoke Jet Bot Combo robot vacuum and mop
First time setup
To set up your Bespoke Jet Bot Combo for the first time, you’ll need to unpack its parts and then charge it. Make sure to fully charge the Jet Bot Combo before using it for the first time.
When you’re finished setting up your Jet Bot Combo, you can add it to the SmartThings app on your phone or tablet. Registering your Jet Bot Combo with SmartThings will let you remotely monitor its cleaning progress and use cleaning features.
Included parts

- Jet Bot Combo Robot Vacuum and Mop
- Clean Station
- Extra Plate
- Washboard
- Power Cord
- Cleaning Tool
Assembly and charging
- Connect the power cord to the bottom of the Clean Station, and then attach the washboard and extra plate to the Clean Station.
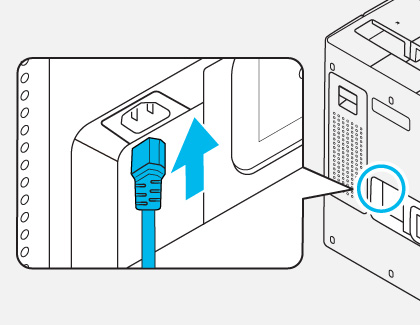
- Place the Clean Station on an even and level floor near a power outlet, and then plug it into the outlet.
- Detach the Clean Water Tank from the Clean Station by pulling the handle on the top. Open the lid and fill it with clean water up to the MAX water line. Then, close the lid.
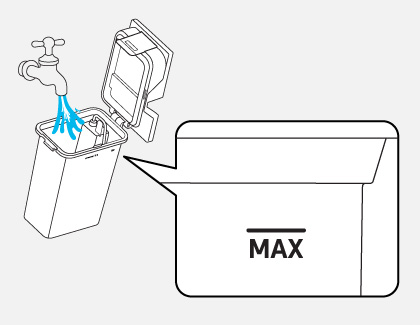
- Insert the Clean Water Tank into the Clean Station.
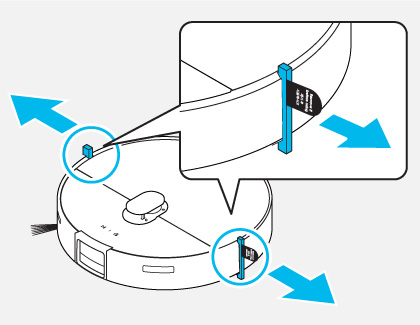
- Next, lift and detach the Spin brush cover on the Jet Bot Combo. Remove the bumper protection gaskets that are attached to both sides.
- Place the Jet Bot Combo on the Clean Station. Make sure the charging terminals on the Jet Bot Combo and the Clean Station are aligned.
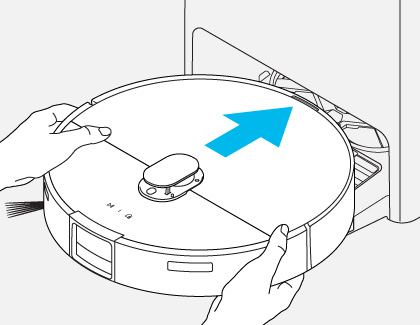
- When charging begins, the status indicator on the Jet Bot Combo will turn on. It will cycle through red, orange, and yellow while charging, and then turn green when charging is complete.
- The Jet Bot Combo will automatically start charging when it returns to the Clean Station after cleaning or when the battery level is low.
- You can manually return the Jet Bot Combo to the Clean Station by pressing the Charging button on the Jet Bot Combo or by using the SmartThings app. You can also physically move the Jet Bot Combo to the Clean Station instead.
Note: If the Jet Bot Combo does not return to the Clean Station to charge, it will go into Sleep Mode. You can press the Start/Stop button to cancel Sleep mode.
Using the control panel
- Press the Start/Stop button on the Jet Bot Combo to turn it on and begin the automatic cleaning process.
- Press the Start/Stop button again to stop the cleaning process.
Note: If the Jet Bot Combo does not operate for 20 minutes after it stops cleaning, it will automatically return to the Clean Station. - Press and hold the Start/Stop button for 7 seconds to put the Jet Bot Combo into Sleep mode. Press the button again to cancel Sleep mode.
Room mapping

The Bespoke Jet Bot Combo uses deep learning capabilities and 3D navigation to survey the surrounding environment and select the optimal cleaning pattern. It will also distinguish between different floor types and use the vacuum or mop modes accordingly.
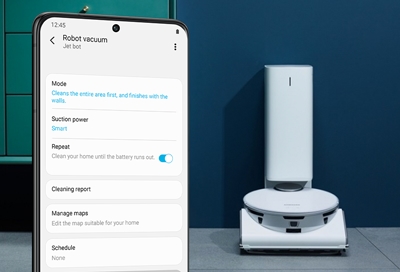
When you first set up your vacuum in the SmartThings app, you'll be prompted to map out your home’s rooms using the mapping feature in the SmartThings. Follow the in-app prompts to create a map of your home. Once you've created a map, you can edit or delete it from SmartThings
- Open the SmartThings app.
- Navigate to the location with your Jet Bot Combo, and tap its card.
- Drag up from the bottom to fully expand the menu
- Tap Manage map, and then select from the following:
No-go zone: Set the areas you do not want to clean.
Edit room: Divide, combine, or rename your rooms.
Edit furniture and appliances: Edit the map’s furniture and appliances.
Delete map: Delete the current map and create a new map.

Contact Samsung Support

-
Mobile 8 AM - 12 AM EST 7 days a week
-
Home Electronics & Appliance 8 AM - 12 AM EST 7 days a week
-
IT/Computing 8 AM - 12 AM EST 7 days a week
-
Text Support 24 hours a day 7 days a week

You Are About To Be Redirected To Investor Relations Information for U.S.
Thank you for visiting Samsung U.S. Investor Relations. You will be redirected via a new browser window to the Samsung Global website for U.S. investor relations information.Redirect Notification
As of Nov. 1, 2017, the Samsung Electronics Co., Ltd. printer business and its related affiliates were transferred to HP Inc.For more information, please visit HP's website: http://www.hp.com/go/samsung
- * For Samsung Supplies information go to: www.hp.com/go/samsungsupplies
- * For S.T.A.R. Program cartridge return & recycling go to: www.hp.com/go/suppliesrecycling
- * For Samsung printer support or service go to: www.hp.com/support/samsung
Select CONTINUE to visit HP's website.


